Going Mobile in a Roadtrek
Dave Whitmore, N1CPP
There were a couple of design criteria for the installation of a dual-band mobile rig in our 2006 Roadtrek 210 Popular. First, the radio should be as unobtrusive as possible. It should be tucked away to avoid the possibility of theft and to make the best use of the available space. Second, it should minimize the impact on the Roadtrek. This means a minimum of holes and permanent changes.
Lets start with the radio. Its a Kenwood TM-G707A dual band (2 meter, 70 cm) rig. It has a detachable faceplate so the control head can be mounted remotely from the radio. The radio itself was mounted in the same compartment as the water pump. The standard Kenwood mounting bracket was attached to the top of the pump compartment and the cables routed through the top finger hole.
This location provided easy access to the antenna cable and a 12 volt DC source. These two views show the compartment open and closed. Note the cables coming out of the top of the box. One set of cables is for the 12 volt DC power which was borrowed from the A/V cabinet above the pump compartment. The other set of cables is for the remote control head, speaker and microphone.
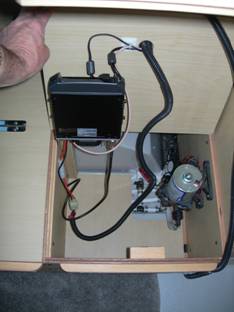
Note that all of the wiring is encased in loom tubing, available from Amazon or your local auto parts store. The tubing keeps the wiring protected from normal wear and tear.
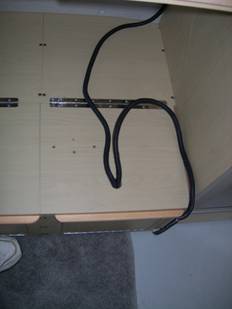
The antenna cable goes aft from the radio. This routing was relatively easy to do since there were lots of openings and spaces to thread the cable. More protective tubing was used where the antenna cable left the pump area and entered the basement. We keep a lot of things in the Roadtrek "basement" and again the idea behind the loom tubing was to keep the wear and tear on the antenna cable to a minimum.
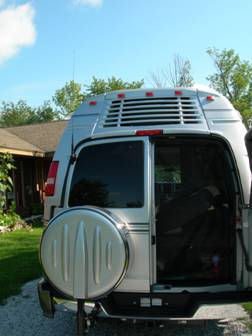 The antenna is a Diamond NR-770H attached to
a Diamond K400C mount. The mount is especially important. It would be
optimal (and easy) to have a mag mount antenna
on the roof but, alas, this wont work with fiberglass. The compromise
is a 4-way mount that attaches to the left rear door.
The antenna is a Diamond NR-770H attached to
a Diamond K400C mount. The mount is especially important. It would be
optimal (and easy) to have a mag mount antenna
on the roof but, alas, this wont work with fiberglass. The compromise
is a 4-way mount that attaches to the left rear door.
The mount comes with a 6 cable and I added a 10 extension to reach the pump compartment. This is a Diamond C110 cable.
There are other excellent antenna manufacturers besides Diamond so just shop around or visit a hamfest.
The last part of the project was routing the cable from the radio to the control head, speaker and microphone up front. Heres the final result.
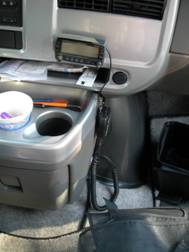 I deliberately put the control head and microphone
on the passenger side, away from the driver. The idea is to avoid the
temptation of using the rig while driving and lose focus on the road.
The passenger is the primary operator. This was just a personal choice.
I deliberately put the control head and microphone
on the passenger side, away from the driver. The idea is to avoid the
temptation of using the rig while driving and lose focus on the road.
The passenger is the primary operator. This was just a personal choice.
The control head is attached with double sided tape which hasnt worked well. It tends to fall off. The mounting bracket could be screwed on but that would mar the dash. I haven't figured this one out yet. The microphone hangs off a U-shaped aluminum bracket attached to the side of the console with double sided tape.
One big mistake I made was not measuring the distance from the radio to the control head. I estimated it at 13 which turned out to be about 3 too short. Unfortunately I had already purchased the 13 Kenwood extension cable and was too cheap to spend $100 to get the 21 cable. (The 13 cable cost $65!) I ended up splicing 3 of wire into the middle of the control cable and that seems to work just fine. Chalk this up as a lesson learned.
The speaker is under the passenger seat and it has a magnetic mount. Since theres a metal bracket under the passenger seat it hangs on just fine. Its quite audible even in traffic.
The cables for the control head, speaker and microphone were put into tubing and the tubing was attached with adhesive mounts and cable ties just off the floor under the kitchen cabinets.. Its out of the way, accessible, and you can't trip over it. The rug between the driver and passenger seats covers the last few feet of the cable run.
This should give you some ideas about how you can install a mobile rig. Use the ideas above and experiment a bit!
73,
Dave